最近研究pygame游戏制作板块,本次对于简单的俄罗斯方块进行介绍。
1.首先引入我们需要用到的pygame库和random库(pygame库基础知识请移步首页)
import pygame
import random
2.对pygame库进行初始化(一般来说,使用pygame库时先进行初始化,保证pygame的代码块可以正常运行)
pygame.init()
3.设置一些初始数据(比如俄罗斯方块的每一个正方形边长box_size、行列数、rgb颜色块)
box_size = 30                       #小方格
box_width = 15                      #小方格列数
box_height = 20                     #小方格行数
width = box_size * box_width        #游戏区域宽度
height =  box_size * box_height     #游戏区域高度
side_width = 200                    #旁白区域宽度
screen_width = width + side_width   #屏幕总宽度
white = (245,245,245)               #rgb表白色
black = (0, 0, 0)                   #黑色
line_color= (139,125,107)           #边线颜色  暗灰色
cube_colors = [(255,245,40),(175,175,20),(185,185,185),(155,0,0),(175,20,20),(0, 155,0),(20,175,20),(0,0,155),(20,20,175)]  #俄罗斯方块颜色组,在后续随机生成俄罗斯方块时会进行调用
4.设置屏幕(此处我们规定的屏幕为(650,600),规定标题栏,屏幕刷新频率)
pygame.display.set_mode() 创建窗口
pygame.display.set_caption() 标题栏
screen = pygame.display.set_mode((screen_width, height))    #屏幕(650,600)
pygame.display.set_caption("俄罗斯方块")      #标题栏
clock = pygame.time.Clock()        #创建时钟对象 (可以控制游戏循环频率)
FPS = 30      #设置屏幕刷新率
5.下面进行窗口主页面的绘画,先来一个例图。
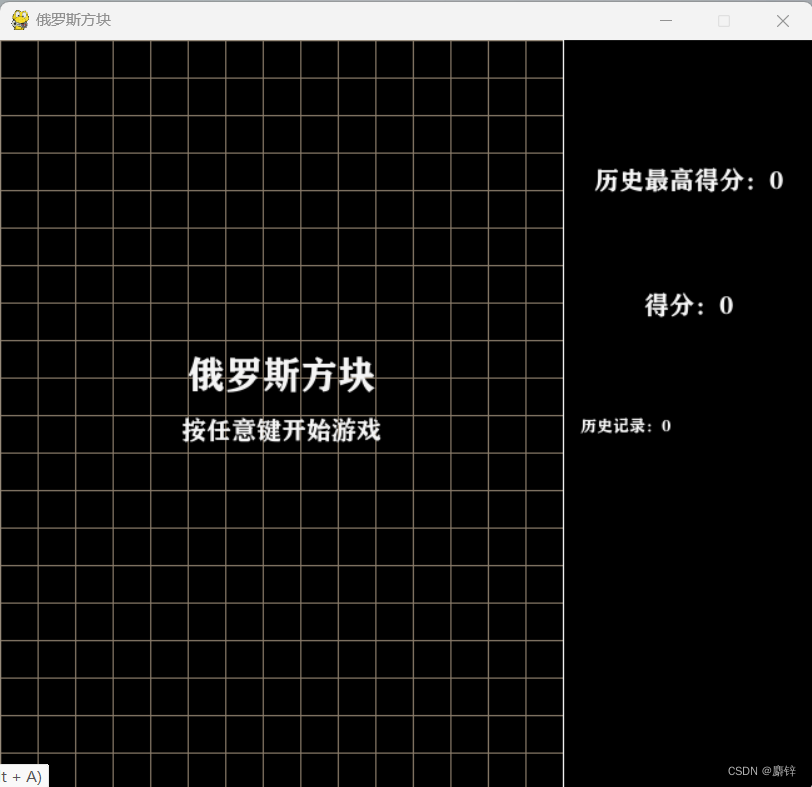
①先绘制游戏区域横竖线,以及游戏区域最右侧分割线
pygame.draw.line(a,b,(c,d),(e,f)) 画线,a为画线的范围(即screen屏幕),b为颜色(本程序游戏区域内部线为暗灰色,饱和度较低),(c,d)为所画线的起点坐标,(e,f)为所画线的终点坐标,线就是(c,d)和(e,f)所连成的线。
def draw_grids(): #游戏区方格线for i in range(box_width):pygame.draw.line(screen, line_color,(i * box_size, 0), (i * box_size, height)) #横线for i in range(box_height): pygame.draw.line(screen, line_color,(0, i * box_size), (width, i * box_size)) #竖线pygame.draw.line(screen, white,(box_size * box_width, 0),(box_size * box_width, box_size * box_height)) #最右侧竖线②设置类show_text用于展示后续的文本
def show_text(surf, text, size, x, y, color=white): #图像 文本 字体大小 位置 颜色 font = pygame.font.SysFont("方正粗黑宋简体", size) #字体字号text_surface = font.render(text, True, color) #文本 光滑 颜色text_rect = text_surface.get_rect() #get_rect获取text_surface所在区域块text_rect.midtop = (x, y) #获取顶部的中间坐标surf.blit(text_surface, text_rect) #刷新surf本身的(text_surface\text_rect)字、区域
③对show_text进行调用,显示汉字部分
score = 0         #初始分数0
high_score = 0    #初始最高分0
historyscore = 0  #历史最高分
level = 1         #初始层数1
def draw_score():                    #得分show_text(screen, u'得分:{}'.format(score), 20, width + side_width // 2,200)    #得分,,20是size字号def draw_maxscore():                   #得分show_text(screen, u'历史最高得分:{}'.format(high_score), 20, width + side_width // 2,100)    #最高得分def draw_historyscore():                   #历史记录show_text(screen, u'历史记录:{}'.format(historyscore) ,13, width + side_width // 4,300)    def show_gameover(screen):          #开局界面展示show_text(screen, '俄罗斯方块', 30, 225,250 )show_text(screen, '按任意键开始游戏', 20,225, 300)
6.规定全局屏幕矩阵为0(表示屏幕上此时没有任何俄罗斯方块在)
screen_color_matrix = []          #屏幕颜色矩阵 将整个屏幕的每一个小方格规定为0
for i in range(box_height):     screen_color_matrix.append([0 ]*box_width)
到此,我们简单的前期构造界面已经完成,下面我们进行俄罗斯方块类的构建。
7.俄罗斯方块类
![]()
①对每一个俄罗斯方块的形状进行定义,并归于元组
class CubeShape(object): #创建一个俄罗斯方块形状类(基类object)shapes = ['I', 'J', 'L', 'O', 'S', 'T', 'Z'] #其中形状,坐标,旋转,下落I = [[(0, -1), (0, 0), (0, 1), (0, 2)],[(-1, 0), (0, 0), (1, 0), (2, 0)]]J = [[(-2, 0), (-1, 0), (0, 0), (0, -1)],[(-1, 0), (0, 0), (0, 1), (0, 2)],[(0, 1), (0, 0), (1, 0), (2, 0)],[(0, -2), (0, -1), (0, 0), (1, 0)]]L = [[(-2, 0), (-1, 0), (0, 0), (0, 1)],[(1, 0), (0, 0), (0, 1), (0, 2)],[(0, -1), (0, 0), (1, 0), (2, 0)],[(0, -2), (0, -1), (0, 0), (-1, 0)]]O = [[(0, 0), (0, 1), (1, 0), (1, 1)]]S = [[(-1, 0), (0, 0), (0, 1), (1, 1)],[(1, -1), (1, 0), (0, 0), (0, 1)]]T = [[(0, -1), (0, 0), (0, 1), (-1, 0)],[(-1, 0), (0, 0), (1, 0), (0, 1)],[(0, -1), (0, 0), (0, 1), (1, 0)],[(-1, 0), (0, 0), (1, 0), (0, -1)]]Z = [[(0, -1), (0, 0), (1, 0), (1, 1)],[(-1, 0), (0, 0), (0, -1), (1, -1)]]shapes_with_dir = { #存储形状的字典'I': I, 'J': J, 'L': L, 'O': O, 'S': S, 'T': T, 'Z': Z}②在class类中,设置初始化类(随机生成一种颜色,确定俄罗斯方块的随机形状)
def __init__(self): #创建类,初始化类self.shape = self.shapes[random.randint(0, len(self.shapes) - 1)] #随机生成任意一种形状self.center = (2, box_width // 2) #俄罗斯方块(0,0)在屏幕上(2,8)self.dir = random.randint(0, len(self.shapes_with_dir[self.shape]) - 1) #任意方块的任意一种例如I[0]或I[1]中的0、1self.color = cube_colors[random.randint(0, len(cube_colors) - 1)] #随机生成任意一种颜色
③确定旋转后的每一个小方格放到游戏区域中间的绝对坐标位置
def get_all_gridpos(self, center=None): #将俄罗斯方块的相对位置转换为屏幕中的绝对位置curr_shape = self.shapes_with_dir[self.shape][self.dir] #确定旋转后的形状if center is None:center = [self.center[0], self.center[1]] #中心点[2,8]return [(cube[0] + center[0], cube[1] + center[1]) #旋转后的相对坐标的位置+中心点位置 ,即确定每一个小方格的位置for cube in curr_shape]
④设置冲突(碰壁无法旋转,下一个位置上有方块无法移动)
def conflict(self, center): #设置冲突 for cube in self.get_all_gridpos(center): #从确定中心的俄罗斯方块中选择一个小方格if cube[0] < 0 or cube[1] < 0 or cube[0] >= box_height or cube[1] >= box_width: #超出屏幕之外,不合法return Trueif screen_color_matrix[cube[0]][cube[1]] is not 0: # 不为0,说明之前已经有小方块存在了,也不合法,即不能旋转return Truereturn False
⑤设置旋转、向下、向左、向右、p键规则
def rotate(self): #旋转 new_dir = self.dir + 1 #下一个图像new_dir %= len(self.shapes_with_dir[self.shape]) #任意一种形状有几种旋转,例如I有两种,new_dir=2 =2/2余0,即new=0即第一个形状old_dir = self.dir #old为初始形状 #因为不知道转动是否合法,需要先保存原先的方向self.dir = new_dir #self现在为新形状if self.conflict(self.center): #设置冲突,新老一样针对0形状self.dir = old_dirreturn Falsedef down(self): #向下# import pdb; pdb.set_trace()center = (self.center[0] + 1, self.center[1]) #中心点变化if self.conflict(center): #如果冲突,返回f return Falseself.center = center #确定新的中心return Truedef left(self): #向左center = (self.center[0], self.center[1] - 1)if self.conflict(center):return Falseself.center = centerreturn Truedef right(self): #向右center = (self.center[0], self.center[1] + 1)if self.conflict(center):return Falseself.center = centerreturn Truedef pause(self): #p暂停 p继续is_pause = Truewhile is_pause:for event in pygame.event.get():if event.type == pygame.QUIT:pygame.quit()quit()if event.type == pygame.KEYDOWN:if event.key == pygame.K_p:is_pause =Falseelif event.key == pygame.K_p:is_pause =Truepygame.display.update()⑥对于俄罗斯方块的下降“过程”中的颜色以及边框进行绘画
def draw(self): #对于下落过程中的每一个小方块进行填色和边框线绘画for cube in self.get_all_gridpos(): #俄罗斯方块的每一个小方格pygame.draw.rect(screen, self.color,(cube[1] * box_size, cube[0] * box_size, #内部颜色box_size, box_size))pygame.draw.rect(screen, white,(cube[1] * box_size, cube[0] * box_size, #线条框颜色box_size, box_size),1)8.绘制静止后的颜色以及边框线
def draw_matrix(): #静止固定后的颜色及边框线for i, row in zip(range(box_height), screen_color_matrix): #i=第几个小方格 row=屏幕颜色矩阵for j, color in zip(range(box_width), row): #j=小方格宽度随机 color=row颜色if color is not 0:pygame.draw.rect(screen, color, #落到底部固定后(j * box_size, i * box_size, #俄罗斯方块内部颜色填充box_size, box_size))pygame.draw.rect(screen, white,(j * box_size, i * box_size, #外部线条填充box_size, box_size), 2)
9.设置消除满行规则
def remove_full_line(): #消除满行global screen_color_matrix #全局方块(判断是否为0)global score #分数new_matrix = [[0] * box_width for i in range(box_height)]index = box_height - 1 #剩余行数n_full_line = 0 #满行数for i in range(box_height - 1, -1, -1): #(24,-1)步进值为-1,输出0,1,2,3,4,5,6,7,8,9...24is_full = Truefor j in range(box_width):if screen_color_matrix[i][j] is 0: #判断第i行的每一个j是否为0is_full = Falsecontinueif not is_full:new_matrix[index] = screen_color_matrix[i]index -= 1 #行数减一else:n_full_line += 1 #满行数+1score += n_full_line #分数screen_color_matrix = new_matrix #全局0更新10.对于事件进行定义,并且获取运行事件(包括移动旋转p暂停o重新开始space空格功能)
running = True
stop = False
gameover = True
counter = 0  #计数器
live_cube = 0  #当前方块while running:     #获取事件clock.tick(FPS)   #帧率for event in pygame.event.get():  #结束事件触发结束操作if event.type == pygame.QUIT:running = False    #如果鼠标点关闭,运行结束elif event.type == pygame.KEYDOWN:   #如果点击键盘if gameover:gameover = False  #游戏没有结束live_cube = CubeShape()breakif event.key == pygame.K_LEFT:   #左  左移live_cube.left()elif event.key == pygame.K_RIGHT:   #右  右移live_cube.right()elif event.key == pygame.K_DOWN:  #下  下移live_cube.down()elif event.key == pygame.K_UP:  #上  旋转live_cube.rotate()elif event.key ==pygame.K_p:  #p暂停游戏live_cube.pause()elif event.key == pygame.K_SPACE:  #空格  加速下降while live_cube.down() == True:passelif event.key == pygame.K_o:    #o重新开始游戏gameover = Truescore = 0live_cube = 0screen_color_matrix = [[0] * box_width for i in range(box_height)]  #游戏矩阵为0remove_full_line()if gameover is False and counter % (FPS // level) == 0:if live_cube.down() == False:               #如果当前物块不能下降for cube in live_cube.get_all_gridpos():   #从当前俄罗斯方块选择一个小方格screen_color_matrix[cube[0]][cube[1]] = live_cube.color  #屏幕颜色矩阵、确定静止颜色live_cube = CubeShape()if live_cube.conflict(live_cube.center):  #冲突gameover = True   #游戏结束historyscore = scorescore = 0live_cube = 0screen_color_matrix = [[0] * box_width for i in range(box_height)]  #游戏矩阵为0# 消除满行remove_full_line()
11.最后对前期所有的绘画即其他函数进行调用,对历史分数和历史最高分记录进行规定。
counter += 1# 更新屏幕screen.fill(black)draw_grids() #调用画出游戏区域方格线draw_matrix() #画出静止后的俄罗斯方块draw_score() #分数draw_historyscore()draw_maxscore() #最高分数if high_score <= score:high_score = score else:high_score =high_scoreif live_cube is not 0: #最后显示游戏结束界面live_cube.draw()if gameover:show_gameover(screen)pygame.display.update() #刷新屏幕到此,本次俄罗斯方块的完整代码已经分块讲述完毕。
程序bug:
①只有俄罗斯方块到(2,8)点,就是在(2,8)点产生物块时,无法再次进行移动,游戏结束。
②下落速度变化过慢。
③无法继续上次游戏(需要用到file存储),但是此次代码只要放到一个py中就可以应用。